How to Change VRAM on Legion Go
Having trouble with games not running smoothly on your Legion Go? The issue could be that the device comes with only 3GB of VRAM. For the more demanding games, this amount of VRAM isn’t quite enough.
Interestingly, the Legion Go doesn’t provide an easy way to change this setting through its Legion Space software. To increase VRAM, you’ll have to dive into the BIOS settings.
Boosting Your Legion Go’s VRAM:
- Starting the Process: First things first, power off your Legion Go. Then, press and hold both the Volume Up and Power buttons simultaneously. Keep holding until you see the NOVA button menu pop up on the screen.
- Entering BIOS Setup: From the NOVA menu, select the option to enter the BIOS Setup. This is where the magic happens.
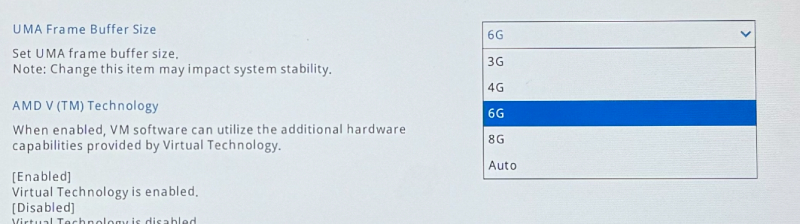
- Finding the Right Setting: Once you’re in the BIOS, look for a button labeled “More Setting” situated at the bottom right of your screen. Click that, then head over to the “Configuration” menu. Scroll down until you find “UMA Frame Buffer Size.” This is where you can adjust your VRAM.
- Selecting Your VRAM: You’ll see a few different options here: 3GB, 4GB, 6GB, 8GB, and Auto. Choose the amount of VRAM you want. If you’re unsure, “Auto” might be a good bet as it adjusts based on the system’s needs.
- Saving and Exiting: After picking your VRAM size, navigate to “Exit” on the left-side panel. Click “Exit Saving Changes,” then opt for a “Normal Startup.” This will reboot your system with the new VRAM setting in effect.